Throw away your SLR and go skiing with the Insta360 X3 360-degree action camera
Over the past few years, I've been doing more backcountry skiing in the winter mountains, and now I can't live without my Insta360 (the latest model is the Insta360 X3)
Until now, the cameras I would take to the mountains were either a DSLR with reliable image quality or a GoPro, which is an action camera that can reliably capture decent footage, but I found both to be somewhat inconvenient when filming in the backcountry
Now, with just the evolved Insta360 and a high-performance smartphone camera, not only can I overcome some of the frustrations and inconveniences of both my DSLR and existing action cameras, but I can also enjoy the unique footage that can only be captured with this camera. Before I knew it, I had gotten rid of my DSLR and GoPro, and unless I had a special purpose, I would just use the Insta360 (and my smartphone)

I want to capture the best ski run video with the Insta360 X3, which can capture immersive 360-degree videos!
the Insta360 X3 However , with recent advances in portability, image quality, and functionality, anyone can now easily create more unique footage that was previously impossible to capture, depending on how you use it.
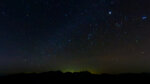
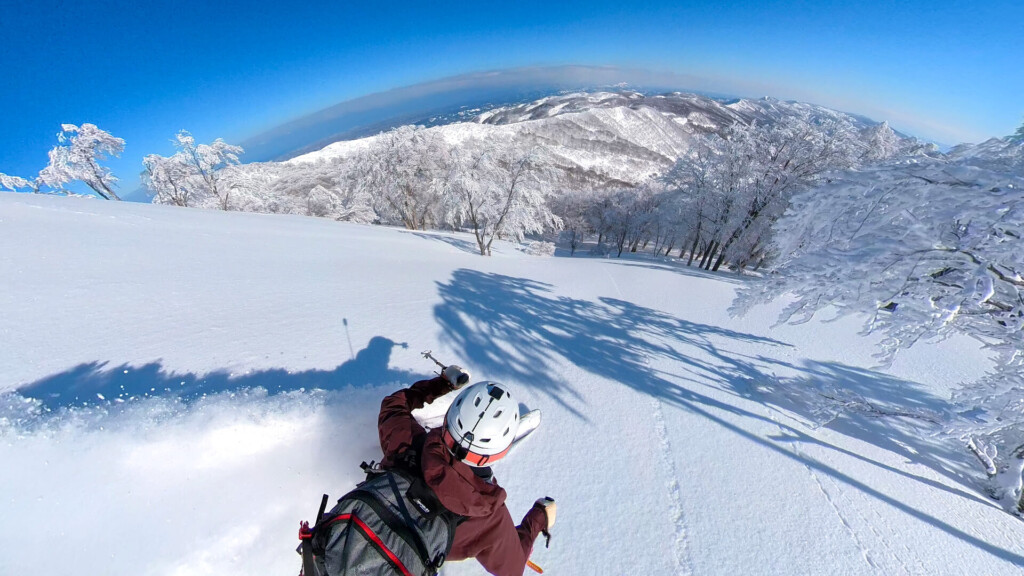
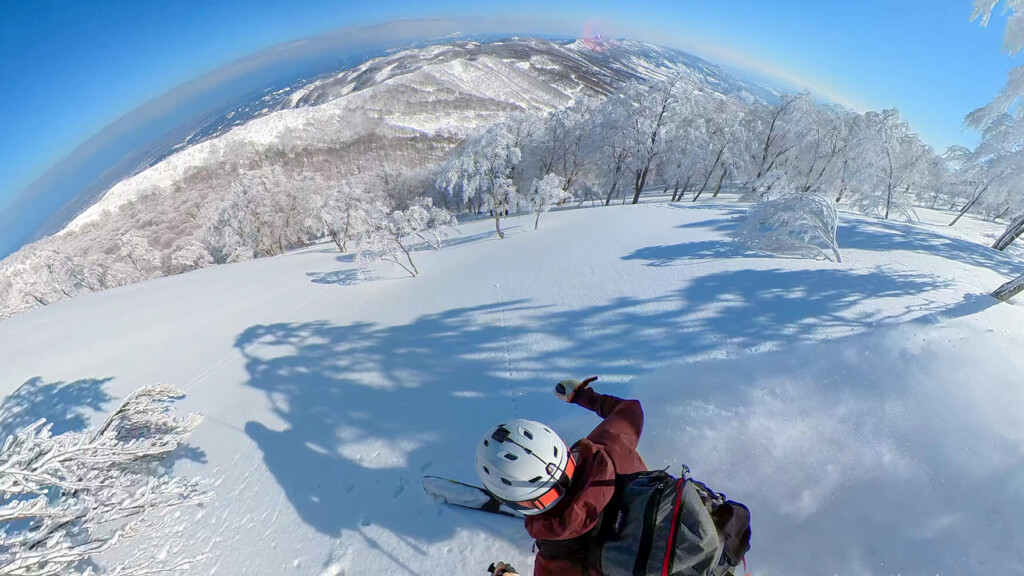
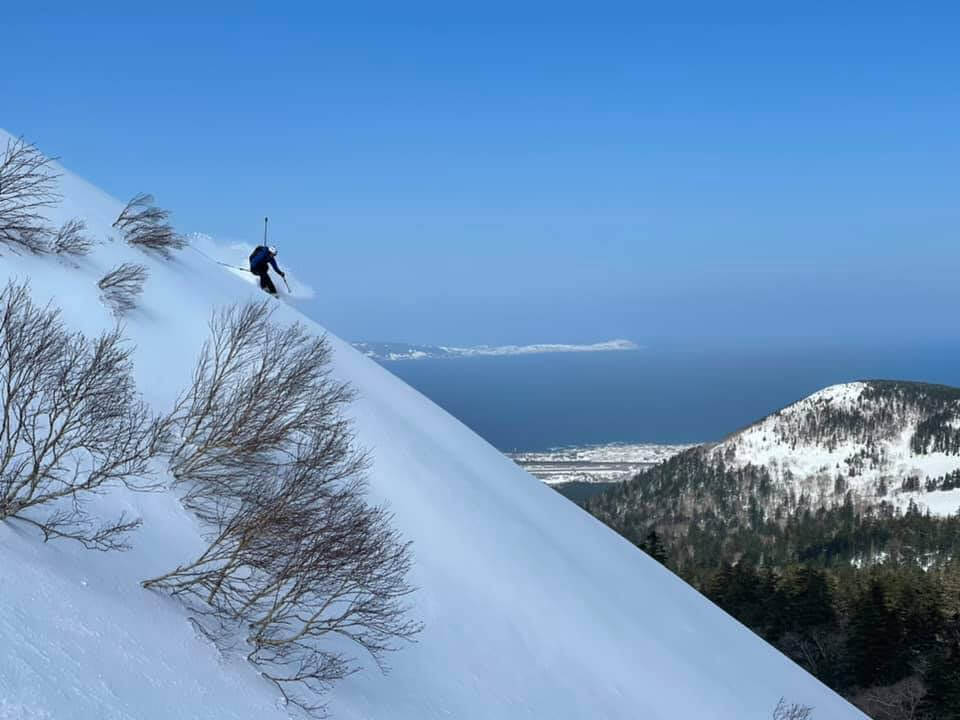
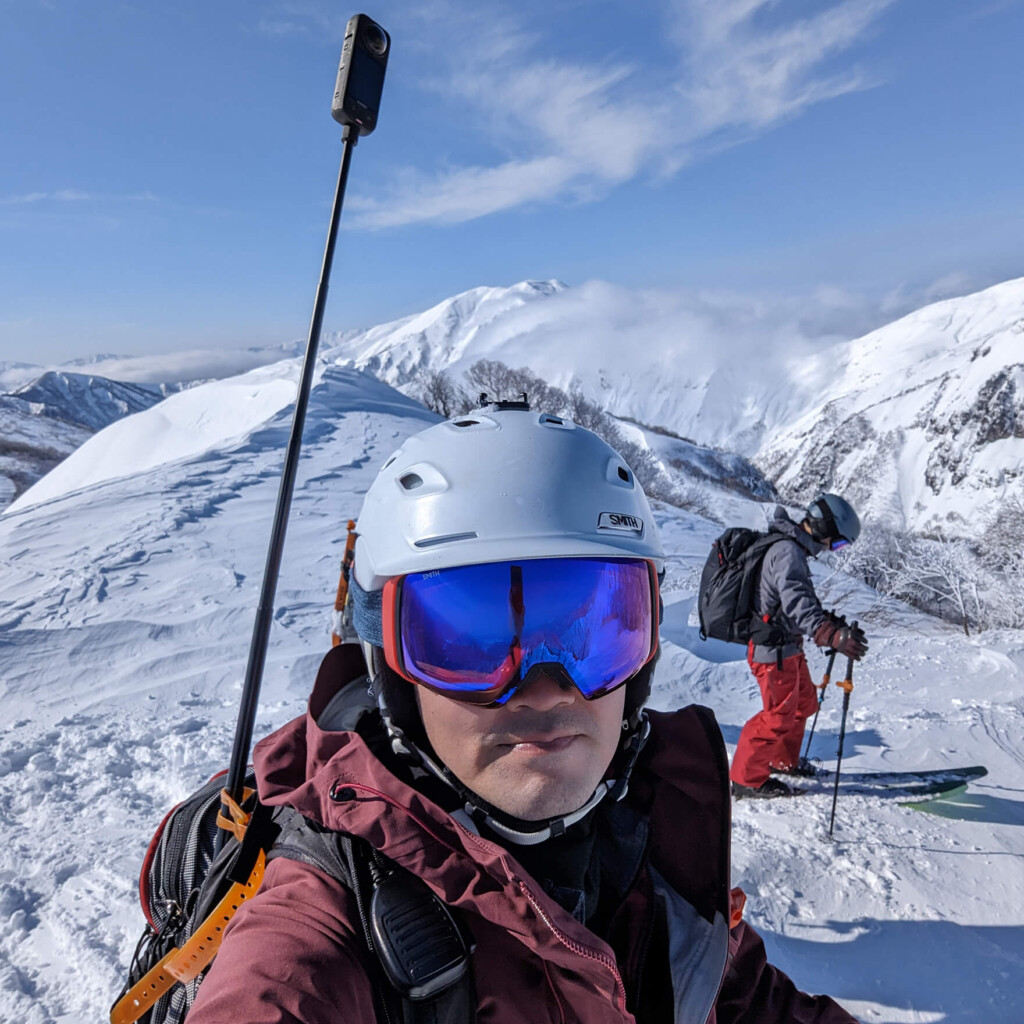
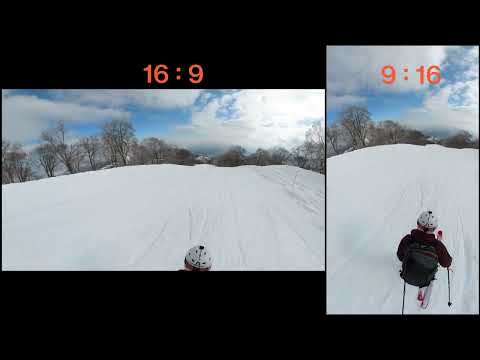
Among these, I'm particularly into the "chasing shot" composition, which makes it look like a third party is taking a photo from behind. Even though I'm shooting alone, I can take photos that look as if another cameraman or drone is filming me (chasing me) from above at an angle (and since both hands are free, I can concentrate on the action). I've attached a photo of a tree run I recently took at Mt. Nabekura using this composition

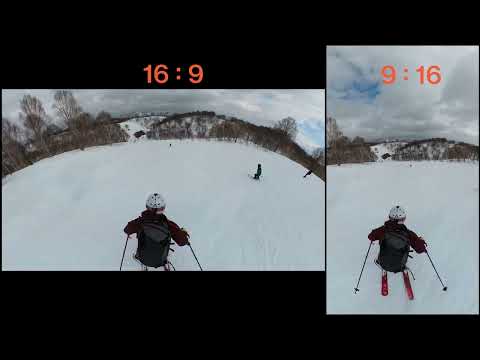
The video below is the vertical angle version posted on Instagram
With conventional action cameras, it's nearly impossible to keep a steady shot of a subject during intense movements like skiing without holding a selfie stick or something similar. With the Insta360, however, this is actually quite easy to achieve. However, this shooting method hasn't yet become commonplace, so I had to use my own ingenuity to find the perfect method
So in this article, we'll be reporting on how we tested various methods to make this kind of "drone-style (pseudo-tracking)" photography easy for anyone, and the best method we arrived at
table of contents
- Introduction: What I like about the Insta360 X3 ~What you can do with the Insta360 X3~
- Point 1: More than enough high image quality and image stabilization
- Point 2: You can trim the 360-degree video you've shot to your preferred composition later
- Point 3: A variety of shooting modes that can handle almost anything you want to shoot with just this one camera
- Point 4: IPX8 rating, waterproof up to 10m, reasonably durable, battery works well even in low temperatures
- Point 5: The invisible selfie stick allows you to take third-person shots (like a drone)
- How to achieve the best drone-style shots with the Insta360 x3
- Finally, I've come up with the best drone-style mounting method for the Insta360 x3
- summary
Introduction: What I like about the Insta360 X3 ~What you can do with the Insta360 X3~

Point 1: More than enough high image quality and image stabilization
With basic use, you can shoot video at up to 5.7K 30fps or 4K 60fps. Even in "Active HDR" mode, which allows for more realistic brightness, you can still get high-quality 5.7K 30fps. Of course, there's image stabilization. The photo resolution is also quite sufficient, with 72 megapixels for 360-degree photos (which are then cropped to a specific size)
Of course, the image sensor is only half the size, so the image resolution is still far from that of an SLR. Also, it's not inferior to the image processing technology of the latest smartphone cameras, so I can't praise it without reservation, but since I leave still image shooting to my smartphone camera, this level of video shooting is enough for me

Point 2: You can trim the 360-degree video you've shot to your preferred composition later
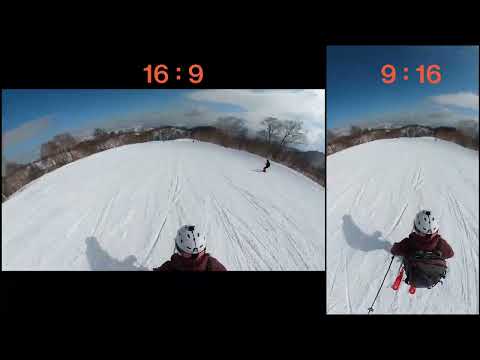
With a typical action camera, you can only shoot video with a fixed square angle of view, so it's not uncommon to find that the angle is off when you check it after shooting (and you can only choose between portrait and landscape orientation). Even if you attach it to a helmet or something and set the angle properly at first, the angle can change without you realizing it as you move around vigorously. In the winter mountains, you often set up the camera in harsh environments where you want to get away as quickly as possible, so there's no time to take your time checking things. The functionality required of a camera in this situation is that it can capture footage quickly, easily, and reliably
With Insta360, you can capture 360 degrees no matter where the lens is pointing, so you can decide the composition later when editing. There's no need to worry while descending the mountain, wondering if you captured that amazing ride properly, and you can freely trim the video you've taken later to portrait orientation for smartphones or landscape orientation for YouTube
Of course, you still have to edit the 360-degree footage later to trim (frame) it into a square video, but the hassle is negligible compared to the benefits, so I've gotten used to it now
By the way, the Insta360 X3 can be used not only for 360-degree photography, but also as a regular action camera by using the "Single Lens Mode." Even in this mode, you can enjoy the action camera functions unique to 360-degree lenses, such as "Me Mode," which keeps the camera angle centered on you
Point 3: A variety of shooting modes that can handle almost anything you want to shoot with just this one camera
I haven't yet mastered the wide range of functions, but this camera has all the functions you need to use it as a regular digital camera, an action camera, and of course a 360-degree video camera, as shown below
- 5.7K 360-degree active HDR video recording
- 72MP still photos (standard, HDR, burst, interval, starlapse modes)
- 8K time lapse video
- 360-degree live streaming
It has a full range of functions that can be used when needed, whether it's for everyday use, on holidays, leisure trips, or outdoor activities, so I would recommend it to a wide range of outdoor enthusiasts, not just mountain skiers like me
Point 4: IPX8 rating, waterproof up to 10m, reasonably durable, battery works well even in low temperatures
If you plan to use it for mountain climbing or skiing all year round, it needs to be durable, waterproof, and able to withstand low temperatures, and it meets all those criteria to a certain extent. Incidentally, the battery also has a continuous recording time of 81 minutes, which is more than enough for pinpoint use (though it's a good idea to bring a spare battery just in case when using it in the winter mountains)
However, the protruding lens is a weak point of 360-degree cameras and must be handled with great care. Optional adhesive lens protection covers are available for this purpose, but the drawback is that when sunlight enters, subtle diffuse reflections appear between the lens and the camera, smearing the image. For this reason, some people choose not to use covers for the sake of image quality (and are happy to pay for repairs if the lens breaks), but in my case, I can easily anticipate falling off my skis or hitting branches while skiing through the forest, so a cover is essential
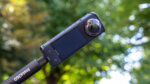
Point 5: The invisible selfie stick allows you to take third-person shots (like a drone)
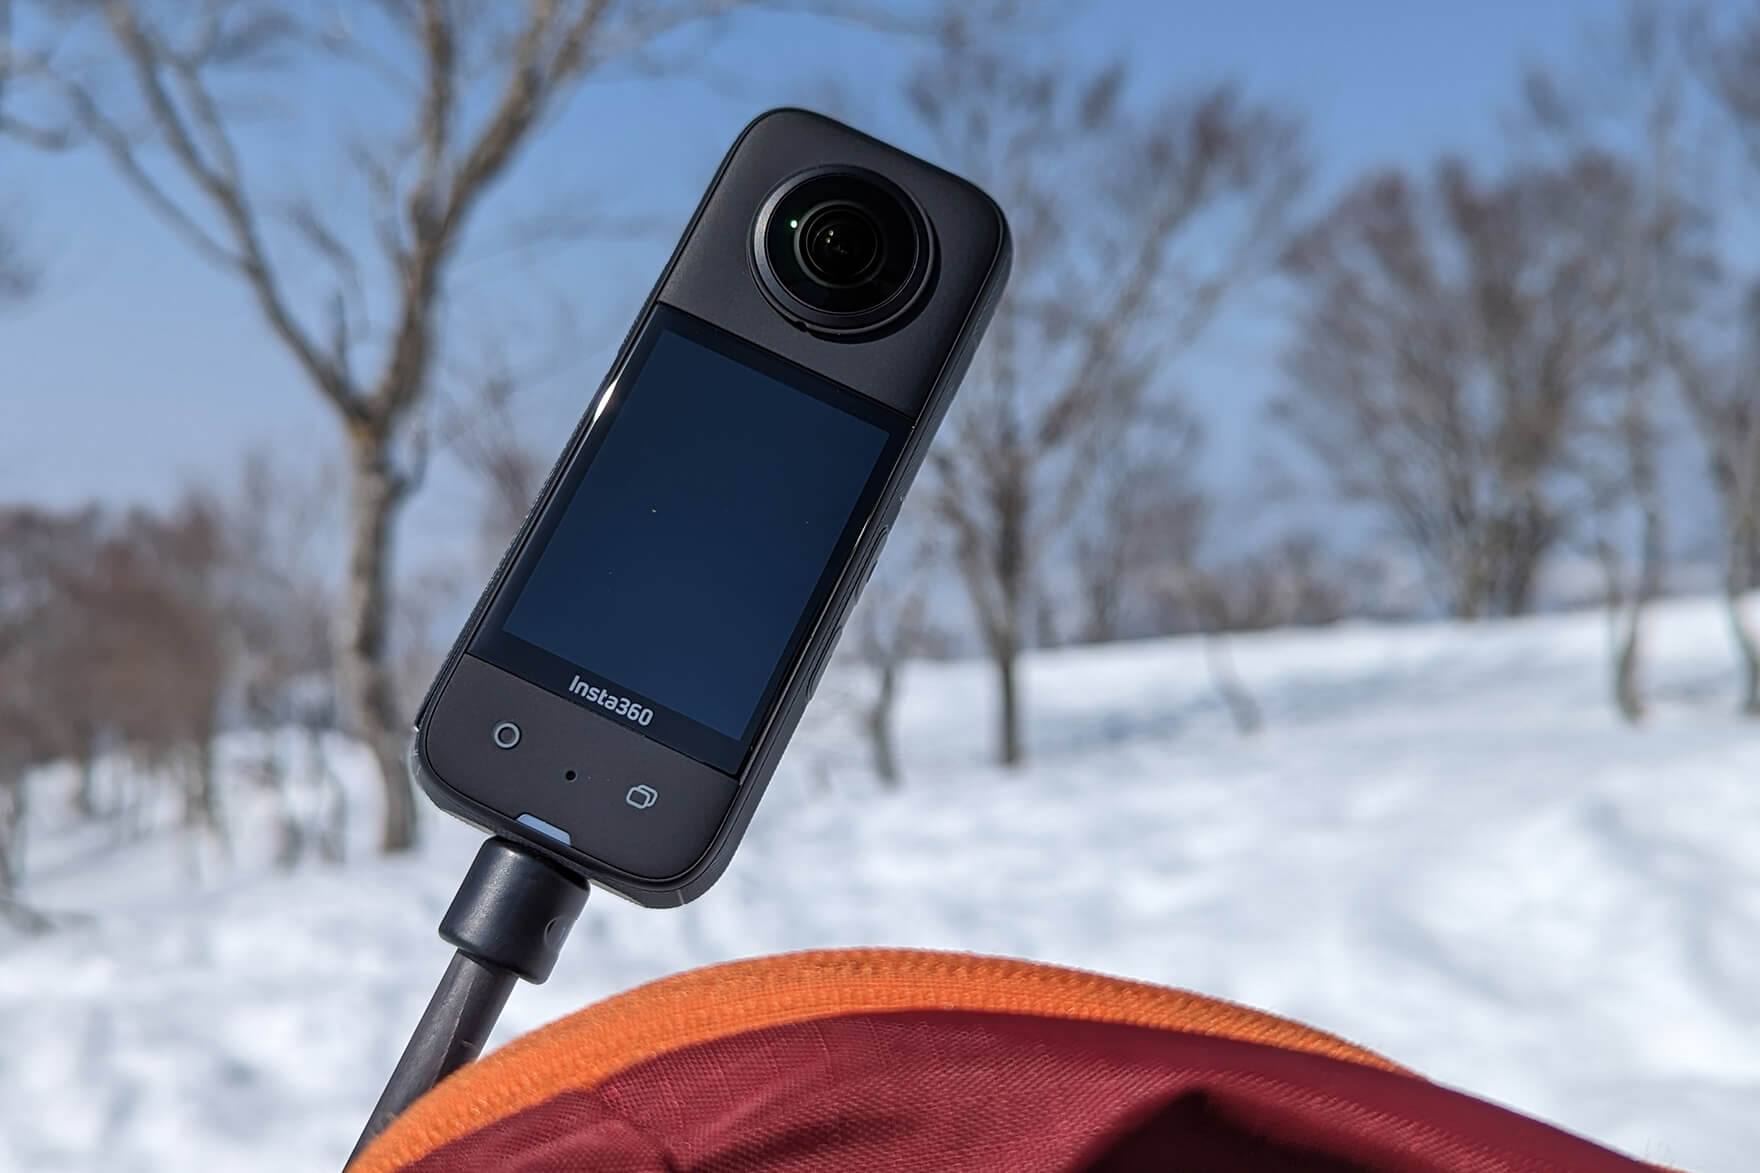
This is the main topic of this article, but when you shoot 360-degree video with Insta360 using a dedicated selfie stick, the selfie stick is processed and disappears from the image. The boundary between the front and rear lenses is also processed so beautifully that it is almost imperceptible, resulting in a natural 360-degree video in which the selfie stick is not present
At first, I was just having fun and tried skating with a camera attached to a selfie stick slung over my shoulder. To my surprise, the footage I got looked like it was being filmed from behind me. I decided it was worth trying to perfect this a bit more, and I became obsessed with this trial and error process
By the way, because this mounting method involves a long selfie stick extending behind you, it can be extremely dangerous (and quite conspicuous) if you do it carelessly at a crowded ski resort or in a crowd. Needless to say, please be aware of your surroundings and enjoy at your own risk

How to achieve the best drone-style shots with the Insta360 x3
Test 1: Simply stick it in your backpack
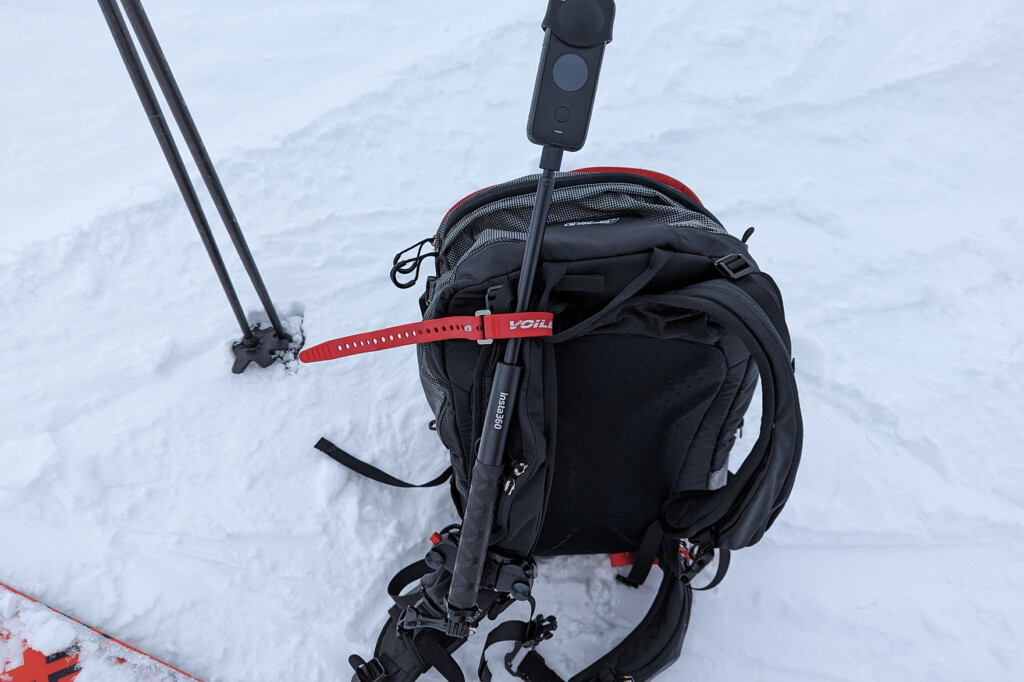
First of all, I tried attaching a 1.2 meter selfie stick vertically to the backpack
Basically, all you need is a selfie stick, and no special mount is needed to secure it in place, but to prevent the camera from rotating around due to intense movement, or to prevent the selfie stick itself from slipping off, attach something to act as an anchor (see photo below). You also need to take measures to prevent the backpack opening or the straps from loosening (I use ski straps to secure the zipper)
The video below was shot in this way (two versions, one horizontal and one vertical, have been exported for comparison)
While I was able to capture the entire scene in portrait orientation, when I switched to landscape orientation, I could barely see myself, resulting in footage that was almost identical to a head-mounted shot. This meant the camera was positioned too high above my head, meaning that if I tried to include myself in the shot, the angle would only capture the ground. The results were almost the same even if I'd mounted the camera in a side pocket rather than the main compartment of the backpack. As you can see from this, to get a bird's-eye view of yourself and the scenery, the camera needs to be positioned at a certain distance and diagonally behind you. Also, to secure the camera securely, I had to compress the selfie stick with my luggage to prevent it from dangling, which was a bit of a pain. The process is simple and easy, so it might work in some cases, but it's not the best mounting method

Test 2: Attaching it to the shoulder strap of a backpack
The next thing I tried was fixing the shoulder strap
When I thought about the best position to place the camera diagonally behind me, I decided that it would be in a straight line extending from my shoulder, like a courier's rod, so I came up with the idea of attaching a mount to my shoulder harness and securing the selfie stick to that

I tried it out straight away and it was pretty good. It was the closest to ideal for just the footage. Above all, the camera angle and sense of distance were just right, as expected, capturing the scene from behind and slightly above me, while still capturing the soft snow surface, the mountains in front of me, and the blue sky. Furthermore, because the camera isn't positioned too high, you can get a sense of speed as you cut through the wind
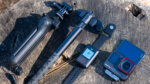
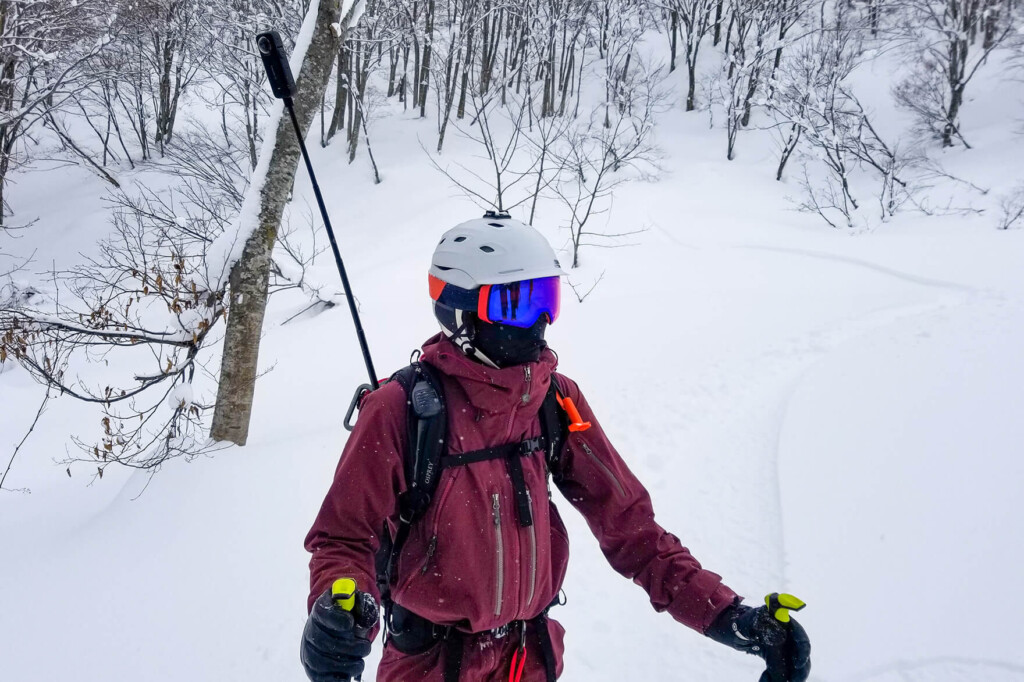
Here's the mount I used for this mounting method. In my case, I attached it to the shoulder strap using Peak Design's Capture camera holder, which I used for carrying my SLR camera, and the POV Kit mount, which allows me to attach a GoPro or similar to it. As long as I can attach the selfie stick to the shoulder strap, it doesn't necessarily have to be this one. I set it on the shoulder strap at armpit height, and then attached it at another point around the side of my neck using a ski strap or something similar (see photo below)
However, while the footage is excellent, there are two major issues with the way it's attached. One is that it's only attached around the shoulders, so the tip of the camera tends to dangle. The other is that the stiff pole is firmly attached to the shoulder strap, so it's a bit painful to wear. The footage is great, but it's a real shame. It seems like it's only suitable for big slopes with pinpoint accuracy and large turns
Test 3: Trying out the original third-person backpack mount (and ski photography kit)
By the way, Insta360 also sells a mount set called the "Ski Photography Set," and this season, they are also selling an optional item called the "Third-Person View Backpack Mount." Are these actually usable? Of course, we tried them out too
First of all, the former ski photography set is a set of a mount for attaching to a helmet, chest, or pole, and a selfie stick, and since it does not take into consideration unusual mounts like the one in this case, it is not relevant to the theme of this article
However, as for the latter, I thought it might be good news for me, as I had been struggling with this and that for the past year, so I tried it out right after it was released
The result was a complete failure
This mount works by attaching a belt that extends from the back to the backpack's shoulder straps with Velcro, but unfortunately this attachment method is pretty sloppy
No matter how tightly you fasten it, the mount quickly becomes loose and floppy when subjected to large centrifugal forces, like when skiing. The ball-shaped fastening part of the mount is also difficult to use in winter mountains, where the temperature changes dramatically, as it becomes too tight or too loose. The structure of the mount made it completely incompatible with the backpack I use. It's a shame, considering how expensive it was
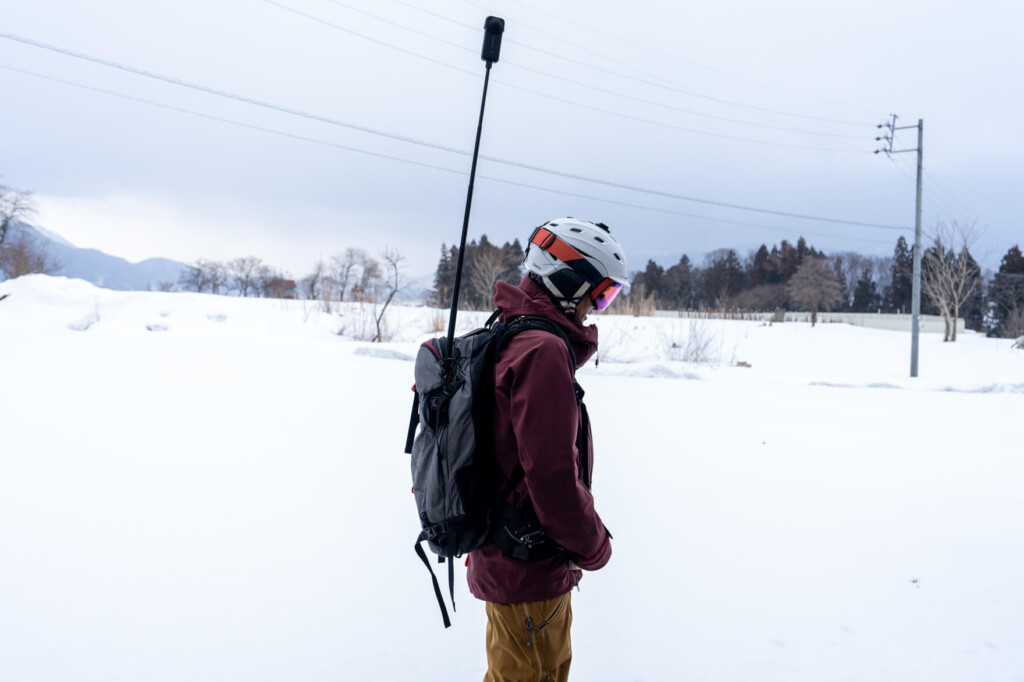
Finally, I've come up with the best drone-style mounting method for
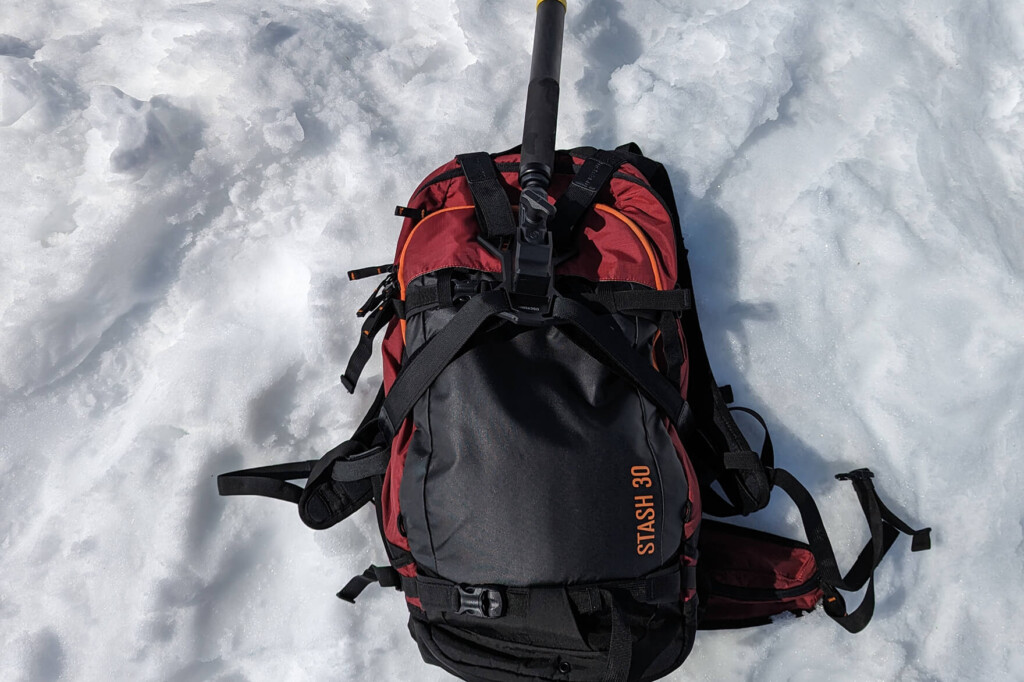
After trying various mounts and homemade fixtures, I finally arrived at this method: running it from the waist harness through the side of the backpack and out the back

With this method, it didn't hurt when I fixed it like I did with the shoulder strap, and I didn't even notice it swaying from side to side. The angle was just right, and I was able to take impressive footage, just as well as with the previous method
Let's take a look at some videos taken with this mount
Although the angle is slightly higher than when it's attached to the shoulder strap, I was able to capture a third-person video of my run with as little distortion as possible, including myself and the scenery in both portrait and landscape orientations (although this footage is actually a bit of a disappointment, and depending on how I attached it, it would be possible to shoot from a lower angle from behind). What's more, it can be attached firmly without swaying, and thankfully, even when attached, it doesn't hurt anywhere on my body
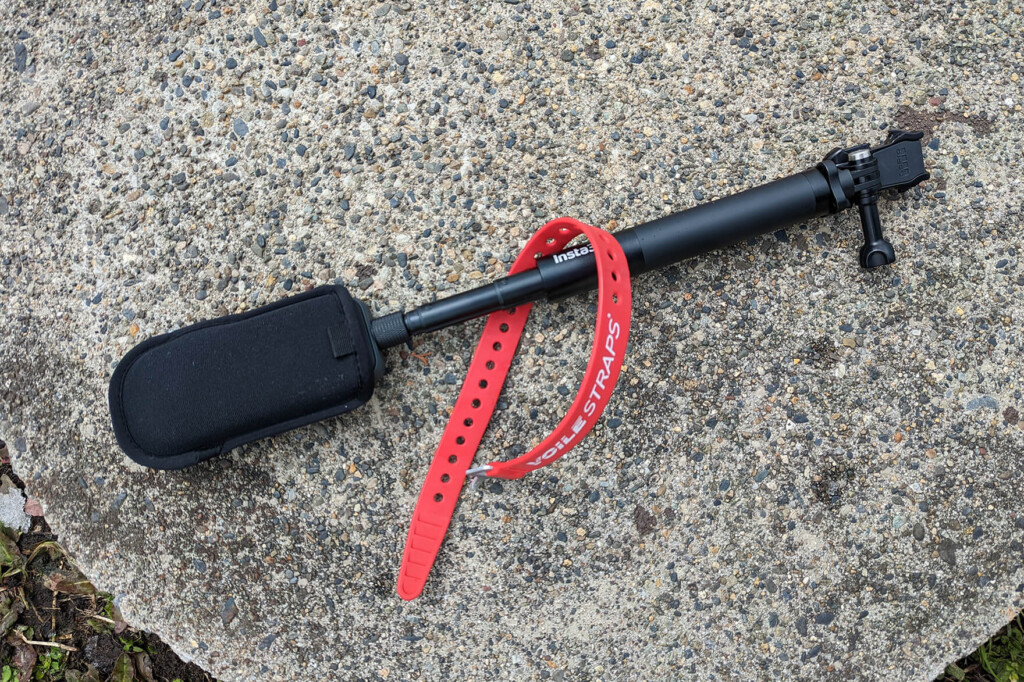
For this method, I used a wristband mount for my GoPro
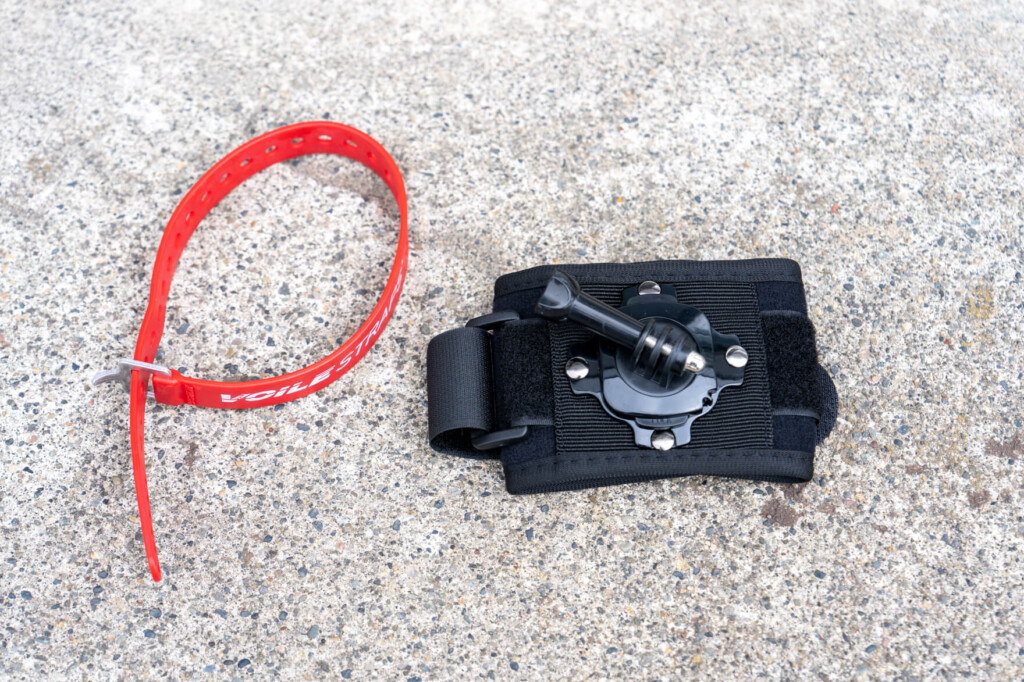
What makes this device so great is that the mount rotates 360 degrees, so you can wrap it around your waist harness and then extend it to the angle you want. It seems simple once you find it, but I never imagined such a great tool would be lying around in such a place
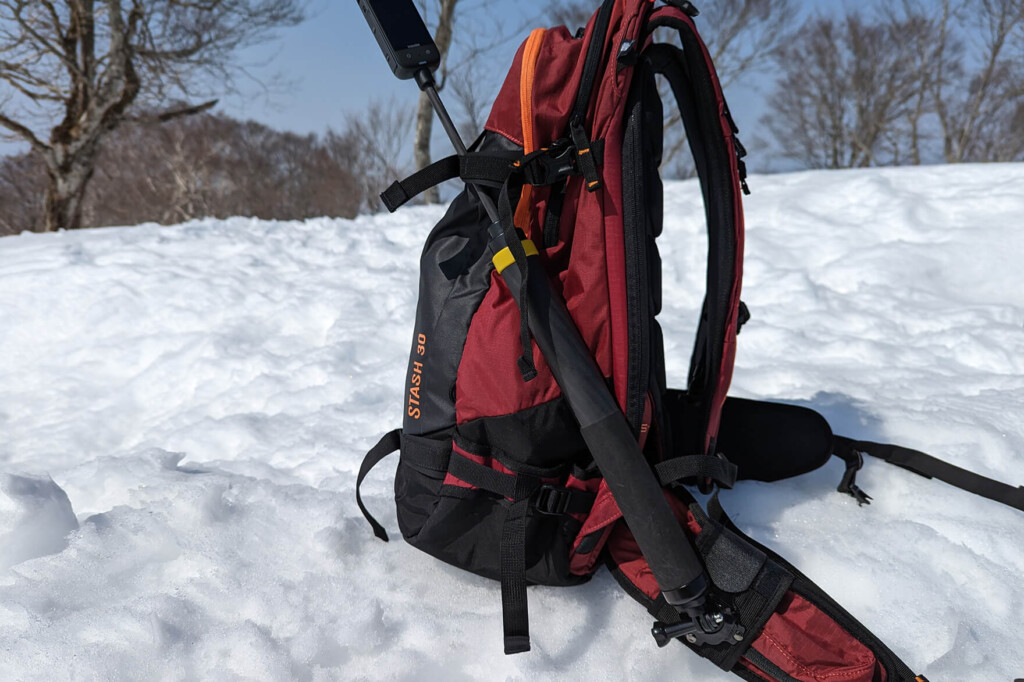
Wrap the wristband mount around your waist harness, then thread it through a loop somewhere on the side of your backpack (the lower the better). If necessary, you can secure it with a ski strap or something similar to keep it from dangling around
summary
This has enabled me to achieve the best drone-style shooting possible, but I still need to test the distance between the camera and the subject. I want to capture footage with as little distortion as possible, so I want to keep the camera as far away as possible, but the selfie stick I'm using this time is limited by its standard size of 1.2 meters. If I were to use a longer selfie stick of 3 meters (without extending it to 3 meters), I might be able to capture a more suitable bird's-eye view from an even further back perspective. In any case, it looks like my journey to find a more perfect mount will continue
There's no doubt that Insta360 is a gadget that has the potential to amaze many outdoor enthusiasts, from those with a casual need to simply shoot 360-degree footage to those who want to capture elaborate footage using their own unique methods. I hope that this will be of use to as many people as possible, including those extremely rare people who want to film their solo ski runs with Insta360
Related reading