What is UL packing like for experts? 04 Tips for choosing shoes & how to tie shoelaces that won't come loose
Even if you wear sneakers casually every day, there are some tips to make them comfortable and safe for hiking and trail running
The fourth video in the "Outdoor Gearzine Trailhead Presents Yusuke Arai Packing Lesson 2016" video series is themed around "Hiking Shoes (Boots)." While the topic itself cannot be covered in detail in a few minutes, Arai spoke about common misconceptions he faces when choosing shoes for hiking (running), as well as his own method for tying shoelaces to prevent them from coming loose
As always, these are opinions based solely on personal experience, so please do not take each conclusion at face value, but rather enjoy them through the filter of your own wise judgment and open mind
What is Outdoor Gearzine Trailhead?
Outdoor Gearzine hosted a two-week, in-person exhibition event at a gallery near Yoyogi Park in November 2016. The event featured a variety of events that were enjoyable for those who want to take up mountain climbing or have recently taken up mountain climbing, including an exhibition of recommended autumn mountaineering gear, a corner offering advice on purchasing gear, sales of rare outdoor gear, a flea market for used mountaineering gear after testing, and a talk event with mountain photographer Yusuke Arai. The event was a huge hit with both readers of this site and casual mountain enthusiasts. For more details on the events, please see the past announcements page here .
Arai Yusuke's profile
Mountain photographer and founder of SHARA PROJECT. As an acquaintance of his father was a matagi hunter, he grew up surrounded by nature from an early age. He has a deep knowledge of a wide range of fields, from traditional trekking to ultra-low-voltage hiking, skiing, mountain biking, hunting, survival techniques, and outdoor gear, and is also well versed in knives. Every autumn and winter, he retreats to the mountains to hunt, and is also a bushcrafter who butchers and cooks in the mountains
"What is UL packing like for experts?" Series list
- 01 What's inside Arai Yusuke's carefully selected backpack?
- 02 The secret to packing is in how you use a stuff sack
- 03 How to use a sleeping bag and sleeping pad
table of contents
table of contents
- Packing tips for ultralight hiking: Tips for choosing the right shoes and how to tie shoelaces that won't come loose (video)
- Video audio transcription
- Video explanation
Packing tips for ultralight hiking: Tips for choosing shoes and how to tie shoelaces that won't come loose
As usual, the characters in the video are Arai-san on the left and me (Hisatomi) the listener on the right
Video transcription
What not to do wrong when choosing shoes
Arai Yusuke: When climbing the Northern Alps, it depends on your leg strength, but this (VASQUE St. Elias GTX) is a bit over-specced.
Hisatomi: Northern Alps?
Arai Yusuke: In the Northern Alps, during the dry season. When most people ask how much they normally carry on their mountain climbing, it's around 10kg. We carry 30-40kg and wear mid-cut trail running shoes. We use Montrail or other really low-cut trail running shoes. We can walk just fine in them, once we get used to walking. But are heavy, stiff hiking boots really necessary? In fact, they might just make you more tired.
Most people climb Japanese mountains at 2,000 or 3,000 meters in shoes designed for climbing 4,000 to 5,000 meters overseas. Furthermore, when it comes to alpine routes, they're actually just regular hiking trails. From a safety perspective, that's the best option, but if you think about whether to climb a mountain with a cast on your foot or to improve your skills and try to use lighter shoes like these, the latter is far more comfortable .
Everyone runs in light low-top boots in mountain races in the Alps, right? It's not impossible. However, only you can judge whether you have the skills to do it, so the correct way to choose is to use mid-top, low-top, or regular hiking boots depending on your level, such as how many years you've been climbing, how much luggage you've been carrying, how many days you've been hiking, and whether you're taking technical routes.
Other things to consider are whether your toes are properly protected even when you change to softer shoes, and your own walking habits. Softer toes are better, softer soles are better, and since there aren't many snowfields, this is fine. Even if there are snowfields, spiked crampons and other things will keep you from slipping. I use them in the summer too. They can be used not only on snowfields, but also when walking in areas with piles of fallen leaves, so I use them when hunting or hacking through bushes. Also, they're great for bamboo ridges. They're also useful in areas with pumila fir forests
How to choose sandals
Arai Yusuke: The sandals you wear at the campsite LUNA SANDALS (sturdy soles). Don't make the mistake of bringing Crocs. Mountain sandals are meant to be worn as a backup in case your hiking boots break. Other good options include KEEN with a closed toe. Crocs are easy to walk through. For example, we often see people who have broken their shoes and have to walk from Yokoo to Kamikochi in Crocs, but in those cases, rocks can get through the soles of their shoes. If you get that far, you'll have to rely on the Disaster Preparedness Association, so it's best to bring something you can walk in properly, like LUNA SANDALS or KEEN.
Hisatomi: It's one with a sturdy outsole.
Arai Yusuke: I guess you need sandals you can run in. If that's the case, I think it would be better to walk more carefully in those Vibram five-finger sandals . They hurt. I thought I was going to die when I ran up Mt. Fuji in them, haha.
How to tie shoelaces that won't come loose
Arai Yusuke: Trail running shoes are popular right now, and surprisingly, they're also popular at trail running events, but tying the laces like this (crossing them all the way to the end, like regular sneakers) is incorrect. The end of the laces should actually go in this hole (the top hole) (not the diagonal one). The last lace should go here. The reason is that if you tie them in the "X" position, they're prone to slipping off, but if you pass them through the top at the end, they won't slip off. They won't loosen. It's basically the same principle as the guy lines that adjust the laces on the outside of tents. The reason trail running shoe laces are long is because you're supposed to wear gaiters.
Hisatomi: Basically, it involves two bends at the end and then stopping with friction.
Arai Yusuke: Since you're supposed to wear gaiters, you put the extra knot in the instep last. The gaiter covers the laces, so they don't come out. This ensures that the looseness never changes, so there's no need to re-tie them. It's important to put the laces in properly like this. For example, take a close look at the reinforced shoelace eyelets. There's only one eyelet per shoe, but the last two are connected. People don't realize this and just put them through like regular sneakers, which causes them to loosen and cause them to fall. People say the ankle isn't supported, but if the upper is tight and fixed, you land without any wobble, so it's less likely to twist . The upper will loosen and cause wobble.
Hisatomi: Is that limited to low-cut trail running shoes, or so-called sneakers?
Arai Yusuke: That's right. There is a way to tie mid-cut hair so that it won't come loose.
When you put your feet in your shoes and start tying them, everyone does it from bottom to top (the second half of the process of putting the laces on the hooks). But then, you only put the laces on the last hook from top to bottom . This way, the laces that have passed through will rub against the knot. This way, they won't come loose. This is the way people who used to wear heavy, sturdy leather hiking boots used to tie their boots. If you do it this way, they won't come loose. Just the way you tie your laces can make a big difference in how comfortable your hiking trip is.
Another common mistake is when some people tie the last knot tightly, but the knot loosens from the top of the foot to the ankle (the first knot from the bottom of the hook). In that case, what you should do is hook the first hook from the top, then hook the next (middle hook) from bottom to top, and finally hook the top hook from top to bottom again, and it will never loosen again. If you hook it at the ankle, it will not loosen at the ankle, so tying it like this will be fine even in situations where the knot is likely to loosen, such as when going downhill.
Hisatomi: You mean the beginning and the end (of the second half that hooks you).
Arai Yusuke: That's right. And there's more. This is actually surprisingly useful at campsites. I think a lot of people bring sandals, but when you loosen the entire lace like this, if you hook the top of the last hook from bottom to top, it will come off, but if you hook it from top to bottom, the end of the lace points downwards, so you can put it on and take it off without it getting in the way . If you do this, you can just use it as a substitute for sandals. If you're not planning on staying at a campsite, you won't need sandals.
Video explanation
Choosing shoes
Arai's talk may have seemed a little extreme, but he spoke of something very important in terms of fundamental thinking. As I've written several times on this site, such as in " How to Choose Trekking Shoes, " it's a common mistake to choose shoes based on outdated common sense, such as "Going to the Northern Alps? Then heavy hiking boots are the way to go."
When choosing the best shoes, the key is the overall weight of the shoes, including your own weight and your luggage. In the past, when even short overnight hikes would be quite heavy, the above assumption of "Northern Alps → overnight hike → heavy" might have been correct, but with the abundance of lightweight, durable equipment and technological advances, most hikers don't carry much weight these days. Given that, it's only natural to conclude that there's no need for a hard sole that can withstand a considerable load or a high ankle that won't twist even under heavy loads. Looking back at my own experience, partly because I don't go on many long-term mountain hikes anymore, but now I rarely wear high-top boots except in winter
However, that doesn't mean that everyone should simply choose light and flexible shoes based on weight alone. It's also important to consider the terrain of your destination, your own leg strength and technical ability, and your susceptibility to sprains. In that sense, a safe way to gain experience is to start with somewhat heavy and sturdy shoes and gradually work your way up to lighter ones. However, while how you arrive at the "perfect pair" will vary from person to person, there's no doubt that lighter and more flexible shoes are more comfortable and easier to walk in
By the way, the spike crampons mentioned last (they are called chain spikes, chain crampons, etc.) are highly recommended as they are extremely useful for walking on low mountains in winter and on snow that remains in the mountains. They provide ample grip on everything from frozen trails and roads to light snow accumulations and snowfields, are more compact than light crampons, and have spikes distributed across the entire sole, making them easy to walk in. Of course, unlike 12-spike crampons, they can be worn with any type of shoes, and best of all, they are easy to put on and take off
I use the CAMP Ice Master model, which I like because the spike plates are stable and durable. You can also get a similar model from Montbell, which has simpler spikes and may be a little less durable, but the usability is not that different


How to tie shoelaces
Many people may already know the correct way to lace trail running shoes, but I didn't. It may have been difficult to see in the video, so I've added a photo below to clarify
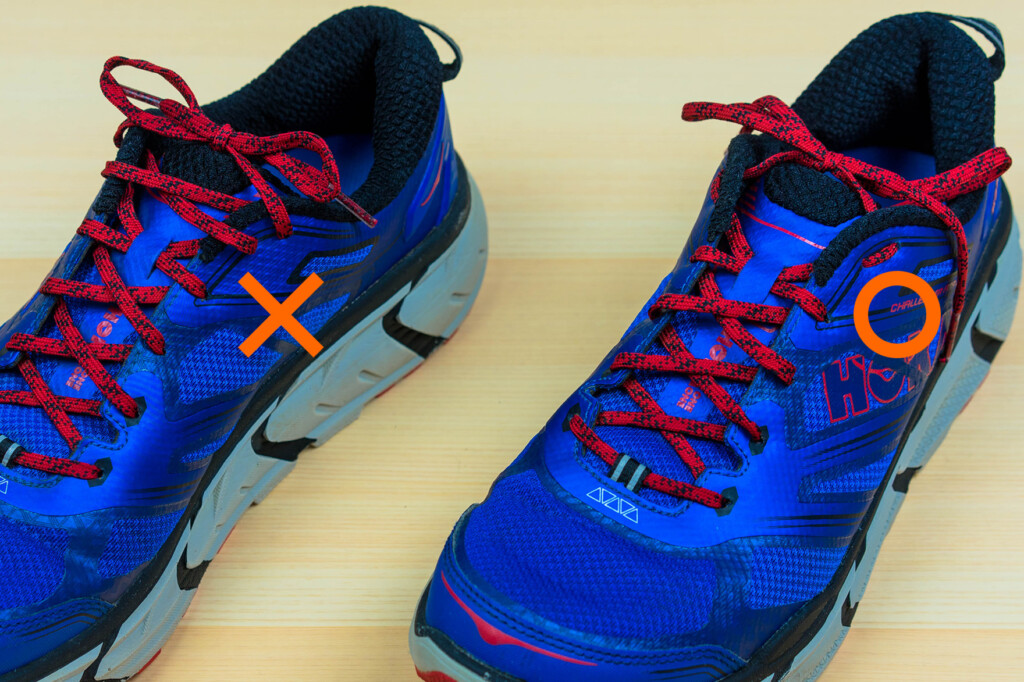
Indeed, simply threading the laces as shown in the photo on the right makes them much less likely to come loose. Incidentally, " RUN+TRAIL Vol. 23, " published in February, contained an even more detailed method for setting up shoes, so if you're interested, be sure to check that out as well!
Next, he introduced a way to tighten mid-cut hiking shoes to prevent them from coming loose. This has been said for quite some time, so many people may already know about it, but for those who found it difficult to understand in the video, I created a supplementary photo. The method is to hook the end of the shoelace hook from top to bottom, which makes it less likely to come loose (see photo below)
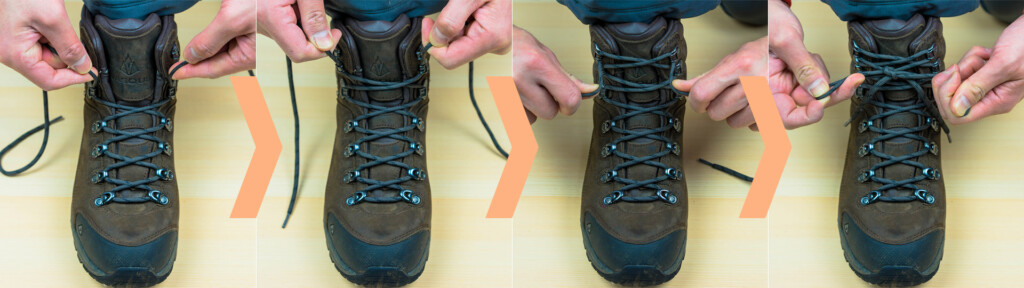
Furthermore, by hooking the beginning of the shoelace hook, located from the instep to the ankle, from top to bottom, this method of tying makes it even more difficult for the ankle area to loosen (see photo below)

I'll also add a close-up photo of how to tie the knots to make them easier to put on and take off at the tent site (see photo below). Just hook them loosely, remove the bottom hook, and then just hook the top hook from top to bottom. It's certainly easy to put on and take off, and yet it doesn't come undone in the slightest

In fact, if you try searching for "how to tie shoelaces" on Google or YouTube, you'll find that there are many different methods introduced all over the world, not just for outdoor activities. If I feel like it, I'd like to summarize them all, but there are some truly acrobatic ways to tie shoelaces that will make you go "Huh?", so it might be fun for you to try looking for them yourself
Finally, while I am personally quite satisfied with this same method at the moment, the above is merely a way of tying that is "hard to come undone," and in my case, I have added one more method to make the knot "hard to come undone." Some of you may already know this, but I will end by introducing that method. Seeing is believing, but in short, at the end of a standard bow tie, pass the loop part of the bow through the hole in the knot one more time. Just by doing this, even the round laces that are common in hiking boots, which are strong but prone to coming undone, become much harder to come undone
Related reading
 What does expert UL packing look like? 05 Tips for good packing and how to choose a smart backpack
 What is UL packing like for experts? 01 What's inside Arai Yusuke's carefully selected backpack?
 What is UL packing like for experts? 02 The secret to packing is in how you use stuff sacks
 What is UL packing like for experts? 06 A vertically long sacoche is recommended